UN RISCONTRO IMMEDIATO
064468590 / 3293806530
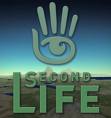 Partire con lo scripting LSL in Second Life.
Benvenuti in "Partire con lo scripting LSL". LSL sta per "Linden Scripting Language" ed è utilizzato per programmare gli oggetti che troverete o creerete in Second Life.
A chi è indirizzato questo tutorial? Questo tutorial è indirizzato a tutti coloro che non si sono mai affacciati alla programmazione fino ad ora, in Second Life o in altri ambiti. Comunque, questo tutorial little sense outside of Second Life. LSL è specifico per Second Life.
Inizierete con il classico script "hello world" ed eventualmente andrete avanti creandone di vostri. Dovrete essere familiari con i principi base di Second Life e del building in generale prima di poter mettere in pratica le tutte le informazioni contenute in questo tutorial.
Step 1. Cos'è il LSL?
Step 2. Avviare il vostro primo script
Step 3. Wash / Rinse / Repeat
Step 4. Uno sguardo più approfondito
Step 5. Mettere assieme
Step 6. Introducing States and Events
Step 7. A closer look
Step 8. A final word on words
LSL è l'acronimo di Linden Scripting Language. Con questo linguaggio sono scritti tutti gli scripts in Second Life. La sua struttura è basata su Java e C.
Gli scripts in Second Life sono set di istruzioni posizionabili all'interno di qualsiasi oggetto, o in qualsiasi accessorio indossato dagli avatars, ma non all'interno degli avatars stessi.
Vengono scritti con un Editor/compilatore integrato che tratteremo nello step 2.
La cosa che rende LSL unico è il forte utilizzo degli "Stati" e degli "Eventi". Una porta può essere "aperta" o "chiusa" e una luce "accesa" o "spenta". Una persona può essere "agitata", "calma", o "annoiata". Molti oggetti reali hanno degli "stati" e la stessa cosa puo essere emulata in programmi LSL. Ogni script ha sempre almeno uno stato: quello di Default.
Ogni evento può essere interpretato come un "Trigger". Gli eventi non sono definiti dallo user in Second Life ma sono interni al LSL. Il Touch_start(), eseguirà il codice al suo interno quando l'oggetto che contiene lo script viene toccato. Quindi uno script LSL deve avere almeno uno stato con un evento al suo interno. Di seguito troverete un semplice programma scritto in LSL che può facilmente essere tradotto come...."Qunado sono nello stato di Default, e vengo toccato, visualizzo "HELLO WORLD" ne canale 0.
Esempio:
default
{
touch_start(integer total_number)
{
llSay(0,"Hello World");
}
}
COSA SI PUO' FARE CON GLI SCRIPTS?
Gli scripts possono far muovere oggetti, farli ascoltare, farli parlare, farli operare come veicoli o armi, fargli cambiare colore, dimensione e forma. Uno script puo far ascoltare ad un oggetto le vostre parole come anche farlo dialogare con voi, gli scripts possono anche far dialogare più oggetti tra loro.
L'oggetto base in Second Life è detto "Prim" o primitiva, che è il mattoncino base con il quale vengono create tutte le cose presenti un SL. Qunado più di una Prim viene linkata, ognuna puo contenere scripts che dialogano con il resto delle prims tramite Link Messages. Questo metodo di interazione risulta molto più veloce e 'privato' rispetto al farli dialogare via chat o via e-mail. Questo comunque va oltre lo scopo del tutorial, ci soffermeremo invece su singoli scripts in singole primimtive.
Lo scripting risulta molto più difficile da apprendere rispetto alla manipolazione base degli oggetti, ma la curva di apprendimento è esponenziale. If you've built in Second Life, everything you can define in the edit window can be defined in a script. All interaction you see between objects or between avatars and objects is via scripts. Learning more about the world and building model is vital to some aspects of scripting, thus I'd recommend a good foundation in building as you learn to script. loading... 8x1 : http://www.instructables.com/static/img/pixel.gif i comments (1)
Come tradizione si parte con il tipico programma che visualizza la scritta "hello world". Poichè il LSL viene eseguito solo da dentro gli oggetti, dovete prima sapere come si creano gli oggetti e cme inserirci gli scripts dentro.
Prima di tutto dovete essere in una land dove sia possibile posizionare o creare oggetti sul terreno. Sia che sia la vostra terra, un terreno dove avete i diritti di costruzione o una Sandbox.
Tasto destro sul terreno poi selezionate la voce 'create' (per gli utenti MAC usare command+click).
Di Default, dovreste vedere un'icona a forma di "bacchetta" con la quale potete cliccare su una zona circostante e creare un cubo sul terreno.
A questo punto si aprirà automaticamente la finestra dell'editor.
(Nota: Per inserire uno script all'interno di un'ggetto già esistente, click destro su di esso e 'EDIT' per aprire la finestra dell'editor.)
Nell'editor troverete il pulsante "more>>>" click su di esso per espandere la finestra e visualizzare le 5 schede:
'GENERAL', 'OBJECT', 'FEATURES', 'CONTENT', e 'TEXTURE'.
Cliccate su 'CONTENT'.
Questa scheda mostra il contenuto di un oggetto che puo comprendere scripts, notecards, altri oggetti, suoni, landmarks, immagini e animazioni.
Cliccate su 'new script' per creare e aggiungere nei contents un nuovo script. Questa operazione aprirà l'editor LSL contenente lo script base.
L'editor colorerà la vostra sintassi di colore diverso a seconda dei comandi o parole chiave che utilizzate, e provvederà a visualizzare una breve descrizione dei comandi/funzioni quando con il cursore rimarrete fermi su di esse.
Esegue pure un controllo sulla sintassi.
Before explaining the code, lets run it. Hit "save" and close your edit window (not the LSL editor window). You should see the words "Hello Avatar" from "object" If you touch the object, it will say "Touched." (make sure the "edit" building window is closed for touching to work. Congratulations! You have compiled and run your first LSL script!
Abbiamo ora uno script funzionante, comunque la maggior parte degli scripts che scriverete non funzioneranno subito al primo avvio. Occorreranno alcuni tentativi poichè necessiterà di correzioni e/o miglioramenti.
Quando si preme il pulsante "save" l'editor LSL "compila" il codice in qualche cosa che l'interprete LSL riesce a riconoscere e darà un messaggio di errore se, nel codice da voi scritto, c'è qualche cosa che non va.
Parentesi graffe, parentesi tonde, e punti e virgola devono tutti essere posizionati nei punti giusti prima che uno script funzioni.
Se siete nuovi nella programmazione questo sarà sicuramente uno dei passaggi più esasperanti.
Parte della programmazione (in tutti i linguaggi) consiste nell'analisi e definizione dei passaggi che il programma/script deve eseguire e nella corretta stesura del codice nel linguaggio che state utilizzando.
Vi ritroverete ad un certo punto a scrivere del codice, avviarlo, e riscriverlo... parecchie volte.
Gli scripts che scrivete vengono avviati subito dopo il momento della compilazione.
Quando li tenete nell'inventario l'esecuzione sarà sospesa ma riprenderà non appena sarnno rezzati di nuovo (If you are not familiar with "taking" and "rezzing" an object you may need to revisit your building skills). Each time you re-write your code you'll want to reset the script. Try reseting the script in the following ways. 1. Premete il pulsante 'Reset' nella finestra dello script. 2. Selezionate l'oggeto e poi nel menu superiore della finestra di Selond Life selezionate la voce
| TOOLS | RESET SCRIPTS IN SELECTION | Also try stopping and starting the script from running via checking and unchecking the "running" button, or the TOOLS>SET SCRIPTS TO NOT RUNNING IN SELECTION and then TOOLS>SET SCRIPTS TO RUNNING IN SELECTION. Once you get comfortable with stopping, starting, and reseting a script, try changing the words "Hello Avatar" and see what else you can make it say.... for goodness sakes keep it PG. WHY STOP AND START Scripting in Second Life can be a little bit like fixing your car.... while going 60mph down the freeway. Thus you need ways to stop the programs for they may affect others. Objects can hold more than once script and they will all run at once. This can be used in the following manner. Say you write a script that makes a prim change color every few seconds. You also write one to make it follow you. Put them both in one object and it will follow you while changing colors! For simplicity's sake, the following examples will all be used individually so be sure not to put two or more into the same object.
Lets take a look at the deafult code. // Code start default { state_entry() { llSay(0, "Hello, Avatar!"); } touch_start(integer total_number) { llSay(0, "Touched."); } } // Code end The code above contains 2 comments, 1 state, 2 events and 2 functions. Lets look at them individualy. COMMENTS Any line starting with two forward slashes is a comment. It will not run and is used to help you document your code. // This is a comment STATES A "State" in LSL is a section that is running, and waiting for events. Only one state can be active at any one time per script. Every script must have a default state with at least one event in it. Except for the default state, each state is define by the word STATE followed by the name of the state. The contents of the state are enclosed in two curly brackets. default { // contents of state go here } state playing { // this is a state called "playing" } EVENTS Events are inside of states. By "inside" I mean it is between the open and closed curly brackets that represent the body of the state. When that state is active, those events wait to be triggered and run the code inside them. We've seen "state_entry" which is trigged by the a state being entered, and "touch_start" which is triggered when you, or anyone, touches an object. Lets take a look at the deafult code. // Code start default { touch_start(integer total_number) // this is an event { // this is the content of the event } // end of event } // end of state FUNCTIONS Functions lay inside of events and are either defined by you or built-in. Those built in to LSL all start with two lower case L's. We've seen llSay() so far. Functions take "arguments" or values in the parentheses that follow it. If you hover over the function in the editor, a popup will show that tell you what the function is expecting. In the case of llSay it expects a number and a string. We send it the number zero and the string "Hello, Avatar!" separated by commas. The function is "expecting" a number and strings and won't take anything else.
Line by line, here is the hello avatar script. Copy and paste this to a new script to see it color coded.
//Tutti gli scripts hanno bisogno di uno stato di default
default
{ //questa parentesi graffa rappresenta l'inizio dello stato
state_entry() // an event
// another curly bracket starts the body of the event
{
llSay(0, "Hello, Avatar!"); // a function inside the event
}
// closed curly bracked closes the state_entry event
touch_start(integer total_number) // another event inside default state
{
llSay(0, "Touched."); // a function between the brackets of the touch_start body
}
// end of touch start
}
// Code end
The instant you save your script, it enters default state, which in turns runs the "state_entry" event which in turn runs the funciton llSay() which makes the object talk. After this the program waits idle in the default state until a new event is called. Touching the box triggers the even "touch_start" which also makes the object speak.
LSL scripts will not run beginning to end . Instead they will look for a default state and wait for an event. Within those events, there can be a call to go to a new state. Lets look at a script with two states with two events in each. The Full Code: ====================== default //default state is manditory { state_entry() // runs each time time state is entered { llSay(0, "turning on!"); //object speaks! llSetColor(<1,1,1>, ALL_SIDES); // sets all sides to most bright // note the semicolons at the end of each instruction. } touch_start(integer total_number) // another event with only one function inside { state off; // sets the script to a new "state" an starts running "state off" } } // this curly bracket ends the body of the default state. state off // a second state besides "default" { state_entry() // this is run as soon as the state is entered { llSay(0, "turning off!"); llSetColor(<0,0,0>, ALL_SIDES); // sets all sides as dark as possible } touch_start(integer total_number) { state default; } } // ---------------end of code ---------------- A simplification of this would be default { //set color to light and, if touched, enter the "off" state. } state off { //set color to dark and, if touched, enter the "default" state. } Note that after "default" all new states begin with the word "state". Also, while the object has a texture, the color will effect the "tint" more than the true color.
Let's examine the default state. First we see the "state_entry" event, which gets triggered each time the default state is entered. SPEAK TO ME! The first line in the event state_entry is... llSay(0, "turning on!"); This makes the object speak "turning on!" on channel zero. What is channel zero? It is the same channel you see all public chat on. A semicolon ends the line and yet another instruction follows. llSetColor(<1,1,1>, ALL_SIDES); This turns the prim to it's brightest tint. If you take the texture off the prim, you'd see it as bright white, with a texture, it looks "normal". The three 1's stand for the Red, Green, and Blue, values of the tint. After that the event is done with the two lines of commands, the script waits idle in default waiting for more events to happen. TOUCHED BY AN AVATAR While idle in the default state a touch will trigger the "touch_start" event. Inside of the "touch_start" event is only one command: state off; This is a command to move immediately to a new state named "off". This state is defined after the default state and nearly mirrors the default state except that it turns the prim dark and when touched will put the script back into default mode. Thus creating a loop. 1. Enters default state 2. Runs code in "state entry" 3. Waits to be touched. 4. When touched enters "state off" 5. Enters "state off". 5. Runs code in "state entry" (note in the "off" state's body) 7. Waits to be touched. 8. When touched enters "default" state. Where the whole thing starts over.
Objects speaking is a great way to know what a script is doing, but everyone can hear it for 30m all around you. As you get into more complex scripts this can get pretty noisy! Three alternative ways to see what is going on exist. SHHHH WHISPER llWhisper( ) is just like llSay( ) but only broadcasts at half the distance. You still l must state what channel. So.... llWhisper(0,"turnign on!"); ...might work a bit to save the sanity of your neighbors. Using llShout( ) doubles the distance heard, but can cut the amount of friends you have in half. :-D llOwnerSay( ) uses no channel and is heard only by you. Very usefull and can triple the amount of friends you have! llOwnerSay("turnign on!"); THE SOUND OF SILENCE You can make a totally silent message via llSetText( ) like this. llSetText("I am on", <1,1,1>,1.0); Cosa significano i numeri? il gruppo <1,1,1> we've seen before. Rappresenta i valori per il rosso, verde, e blu. Per ora sappiate solo che <1,1,1>, indica il colore bianco e <0,0,0> il nero.
Sostituite llSay(0,"turnign off!");
con
llSetText("I am of", <0,0,0>,1.0); Il numero 1.0 finale è l'impostazione alpha (grado di trasparenza).
1.0 significa completamente opaco 0.0 imposta una trasparenza completa (invisible). PROVATE QUESTO: Where would you put a command to say something just before the script leaves the default state? answer: | | | | | | | | | | | V Right above the "state off;" command in the "touch_start" event inside of the default state. Don't confuse it with the "state off" that defines the start of the new state!
//
"); //-->

Pubblicità gratuita per il tuo sito web. Aumentare la visibilità su internet è per noi un passaggio obbligato verso un sito di successo. Da sempre realizziamo i nostri siti ottimizzandoli per il posizionamento e riproponiamo con successo le nostre tecniche anche su siti già esistenti.

Creiamo siti internet a Roma da più di 15 anni, il nostro approccio alla realizzazione di siti web è basato su un'analisi attenta delle necessità e delle esigenze, la scelta di una tecnologia adeguata, il continuo confronto con il cliente.
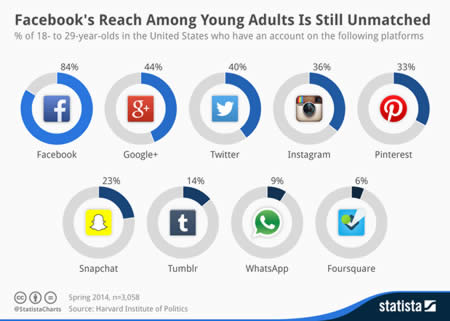
Comunicare ai giorni nostri, significa avere la possibilità di poter accedere ai social network più popolari e verificare tutta la bellezza di poter comunicare in piena libertà. Questo è lo...
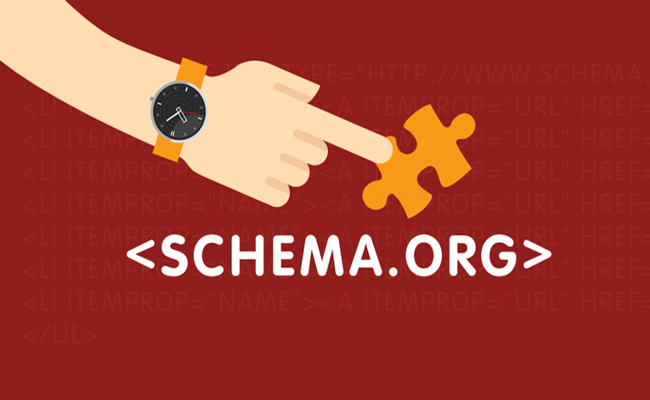
La SEO si evolve ogni anno e chi ci lavora sa bene che rimanere aggiornati è un must. Un modo efficace per rimanere sul pezzo è sfruttare il markup di...

Hai deciso di creare un’app per la tua azienda? Grandioso! Attenzione però, è opportuno armarsi di pazienza: creare un’app non è un’impresa così semplice. In questo articolo andremo ad esplicare...
Se hai realizzato il tuo sito da solo e non sei un grande esperto di programmazione o di grafica, questo non deve essere sinonimo di sito arrangiato. A volte basta davvero...

La link building è una tecnica volta a incrementare il numero di link in ingresso verso un sito web, è inoltre un argomento fortemente dibattuto dalle Agenzie che si occupano...

Sapevi che più del 50% degli utenti sui social interagisce regolarmente con diverse aziende online? I social sono un fenomeno in costante evoluzione e di trend che vanno e vengono...


